I wrote an article in Bahasa Indonesia, entitled Demistifikasi SIM Jepang, about my experience in transferring my foreign driving license into a Japanese driving license. I have no plan to rewrite the whole story into English, but a short-writing here about some advice that I learned during the process may be useful for those who are looking to transfer their driving license into a Japanese driving license.
The transfer process, known as gaimenkirikae, consists of an interview session, a paper test, and a driving test. Without a doubt, the stumbling block for most applicants lies on the driving test. Passing the test in the first attempt is an exception, not the rule. In this driving test, the applicant starts with a full score, which is then deducted for every mistake that is made during the test. The test location is rigidly determined based on the applicant’s domicile address. Each test location has a driving course with a different layout, and the level of the inspector’s strictness may also differ between each test site. I am writing the following advice based on my experience in Moriyama Driving License Center, Shiga prefecture.
Understand the traffic signs
Traffic signs in Japan may be different from those in your country, and some are even written in Kanji characters. Failure to comply with the instruction given by a traffic sign during the driving test will lead to instant termination of the test. In my first attempt, I missed a temporary-stop sign, written as “止まれ”. I did stop the car, but the front bumper have passed the line marking. Stopping far behind the line marking also leads to a score deduction. Japan Automotive Federation (JAF) published a book, named Rules of the Road, that can be used to learn the basic rules, manner, and traffic signs for driving in Japan.
Practice with a qualified instructor
I strongly recommend this before you take the driving test for the first time. Some driving schools offer a practice course for gaimenkirikae at a reasonable cost. The instructor knows the system well and every advice will be valuable. Other than using the course in the school, there is also a chance that the Driving License Center, where the driving test is held, allows its course to be used for practice (with a fee, though).
Consciousness on safety
In my experience, the driving test is more about examining your consciousness on safety. Driving with a divine technique like those in Fast-and-Furious movie will guarantee your failure in the test. Instead, you need to demonstrate that you have great attention to safety while driving. Often the attention should be demonstrated in an exaggerated way and looks dramatic. For example, if you are going to pass straight an intersection, even if the traffic light is green, you have to ensure that the left and the right road is safe. In this situation, moving your eyeballs to glance to the left/right side is NOT enough. You also have to turn your head left/right to demonstrate that you have ensured the safety on the left/right side. When you approached a pedestrian cross, slow down and check the safety on the left and right sides. When you approached an intersection where the immediate view to the left and/or right sides are blocked (in my case, they are blocked by a large signboard), slow down or even stop for a moment to look for any incoming vehicles from the left and right sides. Be aware, what you think is slow may not be considered slow enough by the inspector. The same thing needs to be done when you are going to enter the main road after coming out from a narrow road such as the crank and the S curve.
Starting the car
Before you enter the car, it is recommended to look around the car, including below the car to ensure that no sleeping cat will be accidentally killed. Before you open the car’s door, make sure you once again turn your head to the right and look on your back for any oncoming vehicle.
After you entered the car, adjust your seat, adjust the rear mirror, fasten your seat belt, turn on the engine, then adjust the side mirror. You can also make a dramatic demonstration by pointing your finger to each mirror to show that you have checked them all. Before moving the car, make sure that you turn on the right-turn signal light, and once again confirm the safety of surrounding using the rear and side mirrors.
Changing lane or turning left/right
There are four steps that you need to do before turning the steering wheel to move the car to left or right: (1) look at the rear mirror, (2) turn on the left/right signal light, (3) look at the side mirror, and (4) check the blind spot with your own eyes. As I mentioned before, it is not enough to do step (1), (3), and (4) with your eyes only. You also need to turn your head to make it looks dramatic. See Figure 1 below to get the picture.
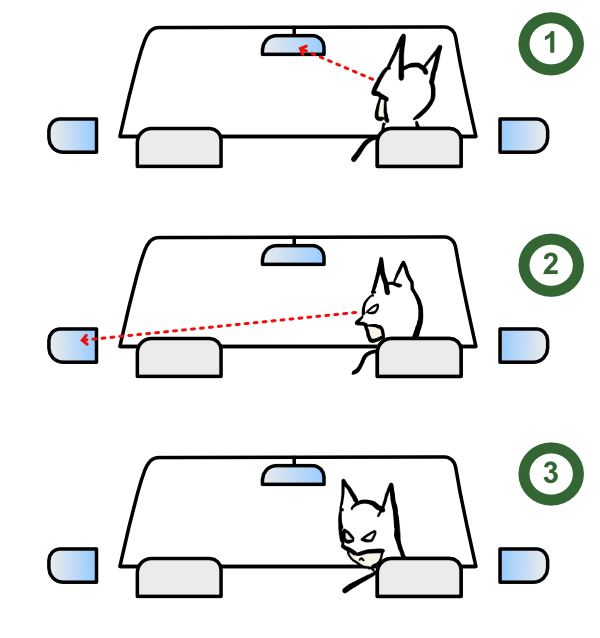
The signal light must be turned on at least three seconds prior to changing lane or turning to the left/right. A more precise expression for this rule is probably: “Do NOT move to left/right before the signal light has flashed three seconds.” I think the rhythm should look like this: look at the rear mirror, turn on the signal light, the first second is to look the side mirror, the next second is to check the blind spot directly with your eyes, and the third second is to turn the steering wheel.
Before turning to the left, you have to move to the left lane to close the gap and prevent any vehicles, especially motorcycles and bicycles, from sneaking on your left side and raise the risk of an accident. However, if you position your car too close to the roadside block, chance that you may hit the roadside block with the rear tire when turning to the left. Therefore, when moving to the left lane, keep the gap about one meter from the roadside block. Again, do not forget the four steps above prior to changing the lane. The same things need to be done also before turning to the right. See Figure 2 for clarity.
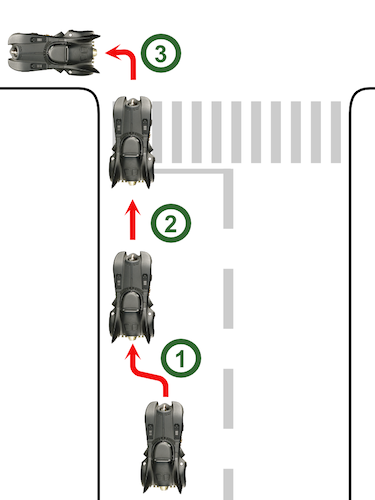
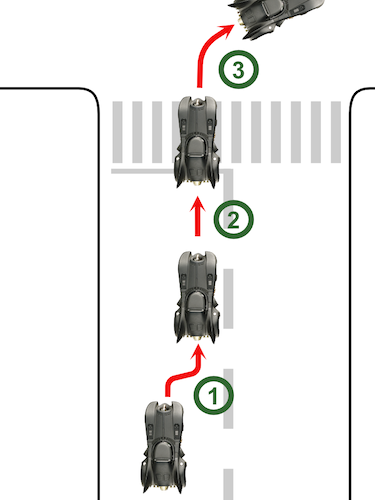
Figure 2: Change the lane before turning to the left/right to close the gap and prevent any vehicles from sneaking on your side. The turning signal light must be turned on at least three seconds prior to changing the lane (No 1), and the signal light must be turned on again before turning (No 3). The gesture set depicted in Figure 1 also needs to be done.
When accidentally hit the sideroad block
If you accidentally hit the sideroad block, for example in the crank or S curve, hit the brake and immediately stop the car. Look directly to the back, and slowly move in reverse to position your car once again to avoid the accident. Failure to stop in this case may lead to instant termination of the test.
Avoiding obstacles on the left
The obstacle here can be a parked car or construction work. The four steps prior to changing lane as mentioned above must be done two times: (1) when you are going to the right to avoid the obstacle, and (2) when returning to the left after passing the obstacle. Side by side, make sure that there is at least one-meter space between your car and the obstacle. See Figure 3 below for clarity.
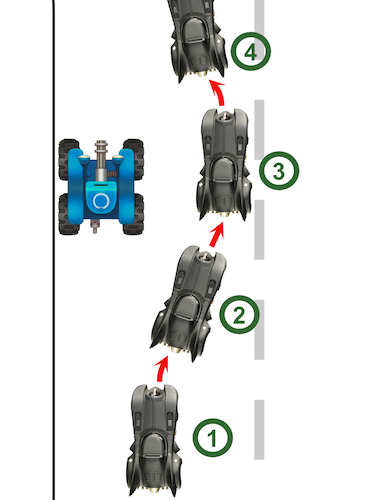
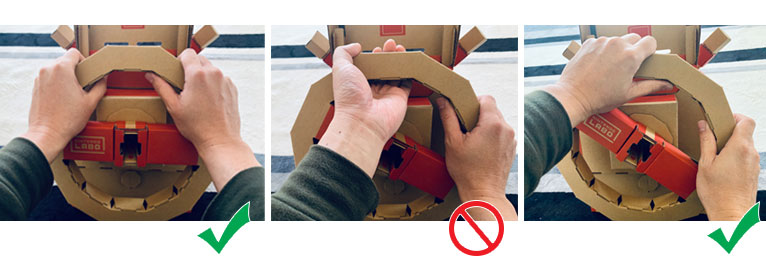
Some habits are considered bad
During the practice in driving school, the instructor reminded me that my left-hand habit to upward-hold the steering wheel when making a right turn will lead to a score deduction (see Figure 4). He also noticed that I always have my left-foot rest on the clutch pedal and that will also lead to a score deduction. A Philippine girl who took the test on the same day with me was warned by the inspector because she turned the steering wheel using only her right palm. I think we all have a certain habit when driving in our home country; but in an unfortunate case, that habit may lead to a score deduction.
Ending the test
At the end of the driving test course, you have to stop the car at a designated point. In my case, it was up to the inspector to determine the point where I should stop. The challenge is that you have to move the car very close to the roadside block so that the gap between the tire and the roadside block is no wider than 30 cm when the car is stopped. Turn off the engine, position the gear to reverse (I am not sure if this is necessary), pull the hand brake, release the seat belt, turn your head to the right and look at your back to check for any incoming vehicle, open the door and leave the car. That will end the driving test.
Keep in mind that the advice that I wrote above is based on my experience in taking the test at Moriyama Driving License Center, Shiga prefecture. The situation may be different when you take the test at a different location.